A blog with stuff. Lots of very random stuff.

REI Backpack

[ I made this for a new  buddy who is interested in a bag I decided I’d be willing to part with ]

The bag is the green one, made by REI. The only identifying marks I can find on it is the word “Alpine”, which is really more of a fashion nomer than an actual model- I couldn’t find anything on it googling.  It’s probably around 8-10 years old, and still very servicable.  I found two spots where the water resistant treatment has rubbed up. That’s treatable by swathing seam sealer over the area if you care about it.  The rest of the bag is still in great condition.

This is a smaller size bag, suitable for day hikes or very light overnights with limited gear.  In classic REI fashion it fits *very* nicely, with a highly usable waist belt that fits my torso length very nice.. The shoulder straps have load adjuster straps on  the top that help pull the load in closer to your back – a nice feature usually found only on higher end bags.


IMG_20140706_152927

Click through for higher res image

Click through for higher res image

Click through for higher res image

Click through for higher res image

Click through for higher res image

Click through for higher res image

Click through for higher res image

Click through for higher res image

Click through for higher res image


It has a large slab pocket inside for a water bag, as well as an exit port dead center so you can route the hose left or right.  The should straps do have a sternum strap, as well as D rings … you may be able to see pace beads hanging off them.

It’s a panel loader which I *greatly* prefer over top loaders.  I carry light loads, 35 maybe 45 pounds top, and have never had a zipper break on me on any bag, so I prefer the organization and ease of access of a panel loader.

It also has it’s smaller accessory pouched disconnected from the main bag, with a buckle holding them together. This lets you throw stuff like rope (in my case) or a wet weather top, a light outter layer, or even a helmet in there for quick access; anything you need to constantly take on and off, you just pass it to your buddy who can throw it in there while you’re both still on the move.

The side pockets are open behind them as well, so you can slip skis or poles behind the pockets.  This works better than trying to use compression straps to hold them in my opinion.


Click through for higher res image

Click through for higher res image

Click through for higher res image

Click through for higher res image


The downside for me is that its not large enough to carry my standard rock climbing loadout (I carry two peoples gear) – as you can see in the one picture, to use this bag I have to have a ridiculous amount of gear slung on the outside – making walking more precarious, and exposing more gear to the elements.  Not a HUGE deal, but all of this gear fits inside the orange Outdoor Products bag easily, allow me to protect my rope and hardware better.

The load in these photos consists of:

Click through for higher res image

Click through for higher res image

60m of climbing rope, 3 harnesses, 2 prs shoes, 2 helmets, tons of webbing, a whole mess of hardware like carabiners, belay devices, etc. and sundries like climbing tape, first aid kit, ground tarp, gloves, etc.

I personally find the orange Outdoor Products bag to be a very good value, but with one major flaw.  The bag itself seems well enough constructed, and is the perfect size for expanding out to carry a bunch of climbing gear, or shrinking down for a hike. I could probably overnight in it during the summer.   The should straps are comfortable enough, I like the giant grab handle on the back, and it accommodates my camelbak. The side pockets are large enough for a FAK or a water bottle, and the strapping lets you carry poles (although a bit haphazardly).

Click through for higher res image

Click through for higher res image

So basically I now have two bags that compromise  – one that fits like a glove but doesn’t hold what I need it to, and one that is lighterweight, perfect size, but doesn’t fit well enough.

The large blue ruck it the Kelty SlickRock -a bag I can’t say enough good  things about.  It’s massive, but so well padded and perfectly fitting that I can load it up like a beast and still hump.  This is a full on ruck and are pretty expensive to buy, but they feature things  like aluminum supports, integrated waistbelt systems that transfer more of the static load to the waist belt, adjustable torso height (VERY important with larger loads to get a good fit), huge amount of nice soft padding, tons of D rings for clipping in gear, and this particular bag features an amazing compression system that really lets you get the bag as cinched up as possible right alongside your back.  This makes for better overall balance and agility.  I’m pretty sure my wife got me this back in the mid-90’s, so it’s around 20 years old now and just got it’s first ding – some stiching around the giant waist belt padding ripped and some foam has herniated.  NOT a big deal, and I’m really impressed at how well this held up for so long.  Granted, this is civilian gear for civilian purposes. It’s not getting thrown on and off deuce and a halfs, it’s not being jumped, tossed fro helicopters, submerged in mud, etc… (wow, makes civilian hiking sound tame doesn’t it !?).

Click through for higher res image

Click through for higher res image

The downside to giant bags like this that you can’t lift your head up when prone, so don’t use them for combat 🙂  And that brings up one of the biggest downsides of ALICE packs – they carry the weight OUT, not UP, so you can fight while prone.  Pretty key ingredient in a combat ruck, buck makes for an overall less comfortable ruck when doing normal civilian stuff.  They pull you backwards, and also the waist belts become less usable since they’re less weight going up and down.  Their backwards expansion also hurts balance  and agility, and the metal frame by itself is heavier than most entire civilian bags.  You may have also noticed the distinct lack of padding in an ALICE pack 🙂 Plus, they only come in OD. After a while you get sick of everything you own being subdued and decide you’d like to try some Color TV 🙂

Click through for higher res image

Click through for higher res image

I still have my modified large ALICE. I have trouble letting go of it for sentimental reasons but I can’t imagine actually using it again, even though I had replaced the metal frame with a lighter weight plastic frame (leg, I didn’t have to worry about it surviving combat jumps, only normal ground-based abuse).   Hate to say it, but when we were given that stuff we were the new thing on the block, but now it’s old and clunky. Yes, we’re getting older.  There’s an entire generation of soldiers getting ready to retire who may not have ever carried an ALICE pack.


I recently rediscovered my ten year old Dewalt Electric Impact gun and decided it was absolutely perfect for helping me replace the rear pads on my 2010 Sienna.  Zipping those nuts off got the wheels off in seconds and completely reaffirmed that I had my mechanical shit together.  EXCEPT that chrome lug nuts and impact guns don’t match and   I stripped two of those suckers down pretty badly.

Lug nuts of old just used to be a big ole steel bolt.  Typically brown after a few days, and hit behind plastic or chrome hubcaps.  These days, everyone has fancy designer alloy wheels with commensurately fancy chrome plated lug nuts.  They look great, but chrome is soft, soft soft and strips so easily.  My impact gun was a really poor (but fricking FUN) choice for putting them back on.  

Replacing the bad nuts was a bit of a saga.  First, I had to get new ones. I bought those online (read https://mattfisher.wordpress.com/2013/08/13/buying-oem-parts-online-for-my-toyota-or-vw/ ).  That was super easy, and all I had to do is remove the old ones.

Remove the old ones; that was the tricky part.

I read about a trick where you take a slightly smaller socket and bang it on with a hammer.  That actually *will* work if the nut is only slightly rounded, as in no corners but you still have flats. Unfortunately, real men rarely strip a lug nut in such a modest manner.  Real men strip those fing things until they’re round as a beer bottle neck. I know.  I tried that trick, using my cool as plastic orange deadblow mallet to bang it in, and trying to break it free just rounded it more.  So did banging the socket in with a 3 pound sledge.  Nope, this technique definitely didn’t work for me. My lug nut was now round enough and smooth enough for me to play steel guitar with.  GREAT.

Enter the SKB Products TURBO SOCKET.  These are impact sockets with a reverse flute design that bites into the nut as you reverse it.  Think screw exctractor, but with a “goes over the outside of the bolt” design instead of “goes inside the screw” design.  These extractors are one of the handiest mechanical tools you’ve never find in stores. 

Image
I ended up buying the HB Productions Tsms 50101b 10 Piece 1/” Drive Metric Turbo Socket Set from Toolfetch.com for 80 bucks.  I selected free ground shipping but they came overnight.  OutF’ingStanding.  Put ToolFetch at the top of my web shopping list now.

I had decided to buy a set because I wasn’t sure what size would work on this nut, and didn’t want to end up in a multi-week mail-order round of trail and error.  I actually couldn’t get *any* of them to bite, and just progressed down in size until they had stripped most of the chrome off and I could now see the actual interior steel nut.  I hammered a 20 on that and it backed right off.   If I had ordered a single size, I would still be cursing Toyota.  I’m really glad I ordered the set.

The construction of these is interesting.  The inside appears to be about 19mm, so if you want to try the “bang a socket on” technique first, use a 19.  The challenge is figuring out the correct orientation.  The bubbly part is just a thing cap – you could probably strip that off with a sharp chisel to see the orientation of the nut, then bang a 19 on it. Image

If you are NOT handy, don’t like to fix things and generally don’t believe in having tools, then would be better off paying a mechanic 100 bucks to use their turbosocket to remove your lugnut.  But then, if you aren’t into tools and doing it yourself, you probably haven’t even read this far.  I ended up saving over a hundred dollars on my first use, and will have them the rest of my life.  Plus the impact gun is just way too fun to not use again, so I’m sure I’ll be using the TurboSocket again.

Anyhow, if you have a stripped or rounded lugnut, try the “bang a socket on” technique.  If it doesn’t work quickly for you, just buy yourself a set of TurboSockets and save yourself some time and frustration.

I recently needed a bunch of parts for my Toyota; a mirror, a rubber plug, new lugnuts and decided to shop online in addition to my local dealership.

I quickly discovered that my local dealerships Internet Presence is a bit, uhm, “challenged”.  Their idea of ordering parts online is “use this form to email our parts department”.  NOT quite the experience I was looking for, so I Google “Buy Sienna OEM parts online”.  I had recently been doing the same for my VW, and quickly realized that the majority of these sites are all the same, but in a GOOD way … I’ll explain:

Dealerships do three things well: sell cars, fix cars, sell parts.  That’s it. The fixing part is a bit debatable (heh), but one thing is for sure: they suck at building web sites. My local Toyota dealerships website is prima fascia evidence of that.  

Enter TradeMotion.   From what I can tell, they provide a turnkey “internet presence” for dealership’s parts counters.   This is a great thing for local dealerships – they don’t have to learn how to manage websites, get an instant “customized” web presence, and voila that cherished fire hose of online sales.  Or at least garden hose.

The sites all feature the same basic programming, and all appear to be hosted on the same set of servers as well, (see that “siteid” parameter ;). Each site gets their own slightly customized look and feel, but to any experienced web developer you’ll quickly tell they’re all based on the same framework, which is fine by me BECAUSE:

TradeMotion provies the actual OEM catalogs for all the supported vehicles.  Throw in your vehicle info and you get ACTUAL DIAGRAMS.  Oddly enough though, not all sites have the diagrams so I’m guessing they are an “upcharge” the dealers pay for.  If that’s true, and you’re a dealer, keep paying that upcharge. The difference between having the catalog and NOT having the catalog is a big one, and was the quickest way I “short listed” sites.

The price variance between all the sites isn’t that large, which makes sense sense because these parts all come from the same suppliers, via the same distribution channels, etc.  However, the shipping and response times on them can vary.

In the end I saved over 60 dollars by buying from PartzNet.com – which is really Conicelli Toyota in Conshohocken, PA.  The experience was fantastic.  Online I narrowed down the parts I needed, and when I still wasn’t sure about one I called in with my VIN and the specialist on the other end got me the exact number so I could place my order online.  THEN – get this – they sent me an email confirming my purchase, to which I replied “Hey, I screwed up and forgot to change the quantity of lug nuts to 3 and I really don’t want to pay extra shipping”.  Shortly after, the manager wrote back “no worries, we just fixed it on the computer and it’s all shipping as one order”.  How is THAT for service !

In the end, I had a great experience buying my parts online.  Thanks to TradeMotion, the mystery of selecting a part was removed because I would peruse graphical catalogs and figure out exactly what the price number is, and then comparison shop it.  In the old days, that could take days alone to do: now you can do it all in an hour or so all with a cold PBR within reach.

The folks at PartZNet.com / Conicelli Toyota in Conshohocken PA were great to work with, and ultimately their combination of embracing the Internet (give that Internet a big ole hug), competitive pricing and great service made them a total WIN.  How ’bout that 😉 Next time I need OEM parts for this van (and they way my wife drives, that could be any day now, nyuck nyuck) I’m going straight back to them.

If you’ve been thinking about buying your OEM parts online, don’t hesitate.  Certainly call your local dealerships and give them a chance to win your business – after all, more of the profits will stay in your own local community – but don’t be afraid to Google and find yourself a nice TradeMotion site. They aren’t the slick, fancy sites like you may be used to from Google or Facebook, but they’re very functional and you can save a load of money. 

If you’re here wondering why on earth your transmission fluid needs to be changed every 40k miles, or why on earth it’s so damn expensive, let me just say this: Wilkomen 😉  You have a Diesel that drives like a gasser, and features some pretty damn advance technology too; get used to expensive fluids.   Just look at the price of 505.01 oil.

Do you really need to change the DSG fluid  every 40 ?  Your call, plenty of gearheads would be mortified at the idea of skipping a scheduled fluid change, but I also know many gearheads who would never change their transmission fluid just because the manual said so.

I CAN tell you this: in the shop, it’s a very expensive service – several hundreds dollars at the least.  The fluid and filter alone is well over 100 dollars.   Why is the fluid so expensive and why does it have to be changed so frequently ? Just because.  Google DSG transmission to understand it’s specialness, than just accept that it’s a pricey new technology and deal with it.

The good news is if you’re the handy, self sufficient type and can Google  you can change your own in about an hour and a half without too much fuss and save a ton.

Here’s what I did:

1. Turn to the fine folks over at myturbodiesel.com and tdiclub.com for annoted picture and video guides to the process.  Seriously, burn that Haynes manual.  Those damn things always just gave you enough information to make sure your car ended up undriveable in pieces.  When I started working on my cars (before the turn of the century – damn that’s fun to say that) those guides were all you could get.   Now you young bucks are  lucky enough to own a car with a very strong web community of owners.  Lucky bastards.

2. Buy your supplies online from VW specialists.  You’ll find great deals at idparts.com, karmatdi and others.  There are many recommendations on the above mentioned forums.  I bought this  DSG service kit http://www.idparts.com/catalog/product_info.php?cPath=175&products_id=941 and this  Filter Pack http://www.idparts.com/catalog/product_info.php?cPath=175&products_id=615 from IDParts.  Check that filter kit out – that’s 50 bucks for 4 top quality, OEM filters.  You can easily walk into an auto store and spend much more than that on low quality stuff.   You’re lucky enough to have a car with a cult-like following of some serious VW gearheads – take advantage of that and don’t mess around with generalist auto parts stores.

Same goes for mechanics.  There’s plenty of independent, private mechanics who only work on VW’s.  Mine is Pete at Ankers Automative in Catonsville – I can’t recommend him enough.  If it weren’t for some really large medical bills my fluid would have been changed by him instead.  I hope he isn’t reading this, but Pete is so awesome he’s probably reading it and will have notes and edits ready for me next time I see him. He’s about the most honest, reliable, affordable mechanic you’ll find, and he’s the only person who’s ever touched my baby.  If you’re in the Baltimore area and don’t want to tackle this DSG fluid change yourself, do yourself a favor and go visit Pete.  Tell him i sent you and he’ll tell you a funny story involving me, lots of German beer and a Kangaroo.  Just kidding, there was no beer involved.

3. Use the “measure” method, not the “factory overflow” method.   If you have no clue what I’m talking about now, study the procedure for the fluid change at the websites above; then the ridiculousness of the “factory overflow” method will become clear.  I did exactly like the site said: got myself a clear plastic container, measured out 1 cup intervals with water and marked the container with a Sharpee. Accurate as a professional graduated cylinder ? Of course not, but we’re talking about transmission fluid, not science class.

4. Like ChittyChittyBangBang, I too used the Walmart spout thingy (because I’ve had one for years), and also used a compressor to blow air into the bottle to flow it out faster.  I used a nail punch to puncture the bottle at the top.  That worked very nicely, because it punched easily, and the hole was the perfect size for my compressor blower  nozzle.  That is, until I overinflated the bottle and blew the hose out of the filler nozzle 😦 THAT part wasn’t pretty and I was worried that I wouldn’t be drastically low of fluid, but given the conspicous lack of oil stain on the driveway I’m guessing the filter housing caught most of it.  I continued to use air to push the fluid out of the bottles faster, but paid more attention to keeping the bottle directly over the hose so I could put more pressure on the hose end.

6.  Latex gloves and rags 🙂   Actually, ever since you could buy latex gloves anywhere, I’ve always kept a box on my toolchest.  They’re incredibly useful, even for brake changes.

7.  Once you have your fluid and filter, don’t even bother opening the box until you have a 14 MM Allen Key.  Yep, have fun with that.   In my case, I had remembered reading about an 8MM Allen key (that was for the snorkel) but forgot to buy a 14 MM key, so I had my car up on ramps and stands, half in the garage, task light going, radio, spent plenty of time carefully taking about the air box, the battery, the old filter, even spent time assembling a new creeper and then completely freaked out after I slipped under the car and realized I  most certainly didn’t have a G-DAMNED 14 FRICKING MILLIMETER ALLEN KEY because WHO THE HELL BUILDS A CAR THAT USES THAT ?

What a sinking feeling.  I had flashbacks of my 20’s: running out to stores 3 towns away in the middle of the night, working on my car at 5 am so I could go to work, not having a car for days, etc.  After rooting through my toolchest and getting creative (hint, internal pipe wrenches won’t work because the bolt hole is too shallow for the cam to grip)   I found my socket wrench adapters.  Image


These things let you turn a socket with a wrench by having a square drive on one end, and a hex head on the other.  Lo and Behold, the medium sized one was PRECISELY 14 MM !  It fits the transmission drain bolt like a GLOVE.


Image

It fits so perfectly in fact that when I put it in to size it, it squeezed out the PB Blaster I had soaked the bolt in.

AND, since the square drive was meant to go in sockets, it has a retaining bearing that held it in the wrench perfectly.

Image

Image

Forged in the USA FTW ! Craftsman to the rescue, and in the end I was able to change my own DSG fluid.  I estimate between rooting for the 14MM solution, fighting the torqued on bolt (with a short wrench, no breaker bar and no cheater bars available) and dealing with the fluid explosion in my engine compartment it took me 3 hours.  A normal one probably would have taken much less time.

And in the end, it cost me about 100 bucks.  Not bad.

Thanks ChittyChittyBangBang over at MyTurboDiesel, and the folks at ID Parts.  You’re enablers.  Chitty, you’re a hero for all the documenting and writeups you do for folks.

Pete, sorry bro, but once this Hopkins bill is paid off she’s all yours again.

Architecting Family Zoo

Several weeks ago I discovered a web app called Family Zoo that lets you manage kids allowances online.  I really liked the flexibility it provided, and architected what I thought was an ingenious little setup for my family … so I documented it, and shared it out.   Since I also found *defects*, and identified desired use cases I forwarded it  to the developers, whom asked to share it online (permission granted).  This is the final article.  It’s basically the same rough notes I had sent them several weeks ago – they edited for punctuation and grammar only. 


Allowances! Modifying Behavior with Money

If your household is anything like mine, various attempts at getting your kids to participate in household chores  through allowances have been futile.   For starters, I rarely have cash on hand and when I do, it’s usually 20’s spit out by the ATM, which forces me to keep mental track of change owed.   I also have trouble providing consistent “dollar values” to chores and tracking their completion, and to further complicate it, I don’t want the kids to spend all their money on Slurpees and Xbox games. (Well, okay, spending it on CoD titles is actually ok with me!)  I’d really like them to get a sense of working towards a goal and learning some financial responsibility.
I’m an avid technologist (I’m one of those guys who was on the Internet before the WWW existed) so like so many other aspects of complicated modern life, I figured software could help. With a little Googling, I found a web application call FamZoo.com and decided to give it a whirl.  Here are my thoughts on FamZoo and how I’ve set it for my family but don’t interpret this as a formal review – I make no attempt to be complete, objective, or compare to other software.

Setting Up Your Virtual Family Bank

FamZoo, which I subconsciously refer to as Family Zoo (although their url is actually famzoo.com) is a web application that allows families to create allowance and savings plans that are as complicated or simple as they’d like.   It allows kids to track what they’re owed in allowance, for all the times parents never actually have cash on hand.   Very importantly too though, it allows you to create a checklist of chores with associated payments and deductions, so the kids can get credited for doing their chore and debited if they don’t.   Additionally, it allows me to create multiple target accounts of money for them, such as free cash, savings, charitable donations, etc and split their allowance into those accounts to enforce savings.   This allows me to enforce traditional methods such as “3 Jars” and the “50/30/20” rules that are suggested all over the Internet.
You can also define multiple income streams for the kids, which I took advantage of to set up a fixed weekly lunch allowance that goes straight into their lunch account.  When setting up incomes, you have your choice of methods to use, and it provides a few calculators for common methods. For example, enter your kids’ birth dates, and FamZoo will automatically do the “buck a week per year of age” approach for you.   So in net, you can define multiple inputs, and multiple outputs, each with separate rules – this is great flexibility that I took advantage of.
Some advanced  features I appreciate include:

  • the ability to control recurring chores,
  • automatically add interest on a weekly, monthly or yearly basis,
  • create targeted savings plans for goals (ie, new cellphone),
  • perform automatic matching of contributions, and
  • the ability to let the kids credit/debit/transfer between accounts.

A note of caution: letting the kids control their own credits and debits opens Pandora’s box! A transaction audit log is provided, but in just 2 minutes my awesomely fast clicking son generated enough confusing unearned transactions that I had to go back and delete them.  I’ve included more detail about this issue at the end of the post.
It quickly became apparent that the two most core concepts were: how to structure the accounts, and how to structure the corresponding chore checklists. For purposes of simplicity, and avoiding World War III, I’m keeping both structures identical for both kids.  
This is what our account structure looks like:

The key goals here are:

  1. set aside their lunch money specifically for that, and
  2. enforce strong savings concepts, and social responsibility.

Emphasizing Giving and Saving with Splits

I’m very proud of our household culture of giving (DD’s 11 year birthday gift request was donations to her favorite non-profit), and I like that FamZoo defaults this Charitable Giving category in.  All of the categories are editable, by the way. In fact, pretty much everything you see in the application can be changed and customized.
The kids’ income is provided in two manners, and FamZoo makes a handy diagram that shows the flows:
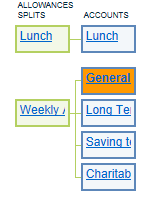
Their lunch “income” is routed directly into their lunch account.   As a description for this account, I added a note that they can keep any lunch money if they make and pack their own lunch, but not if they skip lunch at school.   This was a little motivator I decided to use, as opposed to making it a “chore”.  Kids don’t like chores.
Their weekly allowance, however, is split across the rest of the accounts to enforce best practices, as such:

This is basically a kid friendly modification of the 50/30/20 rules popular with some adults.
I feel like this is good structuring.  The kids are pushed into saving a healthy amount of their money, but the majority of it is still in a general account that they can spend at will (much more generously than they’ll experience as adults!)   I really like the ability to enforce these splits. While teaching the concept of money and earning is important, I think it’s really important to our economy to reinforce the concept of saving cash.

Chores With a Light Touch: Focusing on Opportunities

The chore management is just as important to me, though.  We’ve never had a strongly regulated household for a variety of reasons, including less disciplined parenting than we would have liked as well as other really legitimate reasons.   Therefore, I didn’t want to take too heavy a hand on chores.  Nobody likes chores, and the more intelligent the kid, the more challenging it is to motivate them with menial work.   I do want to leverage the “automatically make or lose money” capability of FamZoo, but not for everything. Plus, using the automatic credit/debit feature means interacting with FamZoo every time a chore is done, or risk automatically losing that pay.  
With this in mind, I decided I do want a few things to be punched off every day, but that the majority of chores and behavior modifications should be treated more as opportunity, not requirement. So, I built a system of fixed allowance each week using the age method.  This is a common suggestion on how much allowance to give, and the site will automatically calculate it for you based on your kid’s age.
Chores are scheduled on a regular basis, and include a credit and a debit.  I don’t structure the credits and debits the same though.  When the chore is completed and they log in and tick the box, that amount flows into their accounts according to the weekly allowance split. In other words, chore credits are automatically divided between general spending, long term savings, short term savings, and charity.  A chore debit, however, is automatically incurred the day after an uncompleted chore is assigned, and comes directly from the child’s general spending account.  In other words, the kids automatically lose money for not doing chores, and they lose directly from where it hurts – their spending.  You could debit multiple accounts via splits as well, but I predict that the kids will view the enforced savings negatively, so deducting from there doesn’t really have much impact in terms of behavior modification.   FamZoo does a great job of letting you decide which account, or which split method (you can define multiple split methods if you’d like) to choose when building a credit or a debit.

Gamification Meets Chores: The Regular, Super, and Ultra Bonus

I have only a few chores – small, daily, easily accomplished things that will get them going and get them motivated.  Everything else is either a bonus, or a penalty.   Penalties are straightforward – behave poorly in some manner, and lose money directly from your general spending.  Bonuses are structured in three ways:

  • A Regular Bonus which is a small amount of money that’s split.
  • A Super Bonus is a larger dollar amount that goes directly into their spending account.
  • An Ultra Bonus is geared at the toughest behavior modification, is high dollar, and goes directly into spending.

Yes, I’m trying to make this look and feel like a video game.
The actual checklist looks like this:

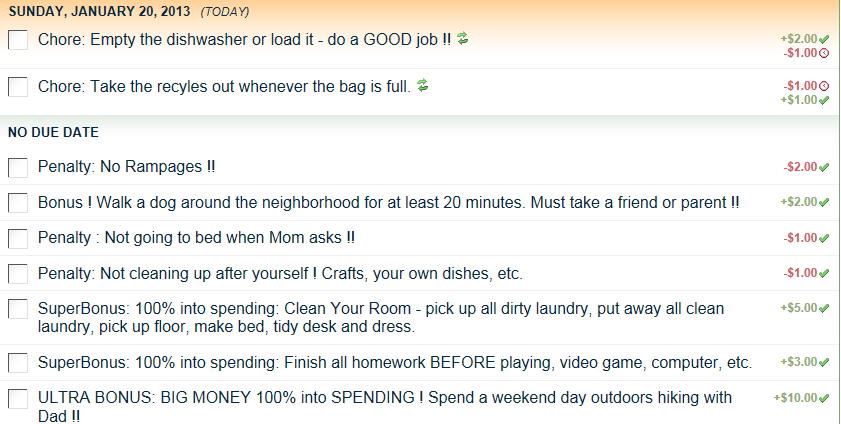
I have additional bonuses for things like:

  • Eating a salad as a meal
  • Skipping dessert
  • Spending a day without electronics (This one is high dollar!! )


The Kids Will Be Paying for More


Some of these dollar amounts may look unreasonably high, but remember, I’m trying to create some serious behavior modification here, and I do enforce savings.  Part of all this plan is that the kids are going to start paying for things I’ve traditionally paid for out of pocket, such as their cellphones, ongoing videogame charges, riding lessons, electronics etc.  With that considered I don’t think it’s unreasonable.

Day 1 – Introducing FamZoo to the Family


The kids reacted very well to the “few chores, but many potential bonuses” philosophy.   At first DD was very glum when I started showing her the site, but when she realized that she only got penalized for a few basic chores, and the rest was all upside, she cheered right up! (Heh, I didn’t mention all the Metric 2 comp and mandatory cross-product goals yet … no wait, that’s MY job.)

DS reacted well also, agreeing that the few chores I did ask each day were pretty basic and easy.  The chores were simply:

  • don’t leave clothing lying around,
  • walk a dog every day,
  • take out the trash.


Easy peasy, and that was the goal.

Reported a defect:  First of all, there’s a defect in changing chores from repeating chores to non-repeating.  Basically it won’t work, and you’ll have to delete the repeating chores and key it back in.  I already notified the FamZoo development group, and like a true software startup, one of the developers responded within an hour, on a Sunday night of a holiday weekend.  Ah, startups, how I love to miss thee.

Day 2 – Working So Far


Today I logged in as an adult and deleted the automatic debits that occurred, since I wanted to give the kids a warm in period . By reminding them gently through the course of the day that they did have some chores to do, and that there were some big bonuses available, I got them to pick up laundry, take out trash and recycles, do dishes, and even spend a couple hours cleaning the house with me .   DS even emptied all the trash cans and took the trash to the curb, willingly, cheerfully, quickly, for possibly the first time ever.   His best friend was over all day for a lan party, which definitely had him in better moods though, so I can’t tell how much was the incentive plan, and how much was having his friend over.

A Warning About the Child Permissions Setting


As mentioned earlier on, I discovered another aspect of the software, which prompted me to change some settings.  You can give the kids the ability to credit, debit and transfer funds between accounts themselves.  This actually works as designed; if you check that box from within an account setting they can indeed add and remove funds, and transfer funds.  The glitch is that they can literally add $500 to an account if they wish.  You have the option of creating email or text based alerts (which I did to confirm operation), but this essentially gives them a complete backdoor to gaming it.  Less clever kids will do something like add 500 dollars – easily detected through basic auditing or notifications.  Clever kids like mine however, will quickly learn that adding a few bucks here or there, justifying it with a “oh remember I did this but forgot to log in and check it off” will quickly spam the human auditor (Mom or Dad) and a-skimming they will go.

Clearing the Child Permissions check box in the account settings will prevent this possibility, but unfortunately ALSO prevents them from transferring funds between accounts.  I’m fine with this, as I really want them obsessing more about earning the funds than re-allocating them since I’ve already defined their allocation splits for them, and when they do want to, say, move a bunch from general spending into charity or long-term savings, I look forward to the conversation.

I think a good future design, however, would be to separate transfer permission from the credit/debit permission with the requirement that the parent be able to designate to-and-from relationships – this would also have to be many-to-many, so that I could allow transfers from savings or general spending into long-term savings.   I think it would also be a creative design to allow credits and debits to be request  based. Rather than notifying that the action occurred: FamZoo would send an email or create a message queue in the interface notifying the parent that the child requested to credit or debit. The parent could permit the action from the message queue in the UI or by responding to email/text alerts.

I don’t like the idea of my kids getting to gunk up the transaction log.  Please note this is a very real risk. My son, within about 45 settings of logging in, had rapidly created a complex set of transactions that I actually had difficulty reviewing and reversing.  But then, you know my boy, he’s an intelligent and evil as his old man… That is, of course, all hear-say!

A Few Other Caveats


The kids also can’t “print a check out” like other apps (that let them print a check to be cashed by Mum or Dad, and automatically debit the system).  I’m fine with that too – again, I’m really trying to encourage focus on the earning and the behavior modification.

Another glitch I found is that chores without an associated due date (which are the majority of mine) do appropriately appear as having no due date, but they disappear when punched off and can’t be reused.  In other words, they’re still temporal, despite not being assigned to a specific day.  DD had punched a bonus yesterday that she wasn’t able to punch today because it was gone.  The solution to that was to change all the bonuses from “No Due Date” to a daily recurring, so that they showed up every day.   Since these are bonuses, with no penalties for missing them, the fact that they expire every day have no bearing.

Final Thoughts


I would love to see some more behavioral modification features like bonuses and ‘constants’ included in FamZoo. It’s already very feature rich, and I think it’s prime for extension into other clever areas.  This is, in fact, a piece of software I would love to work on myself. It’s fun. It’s well designed and executed to date, but I can already identify meaningful ways for it to grow.

On Memorial Day weekend my family went camping with neighbours on an annual ritual, and I hiked 5 miles with the guys.  One of the younger guys (neighbor’s son) and I were getting stymied at the pace, and received ok from the group to break out.  And break out we did.  I was surprised at how fast I could do the 5 miles, and literally without breaking a sweat (shade, perfect weather, a camelbak full of ice and dry-wicking shirts.

I then decided that hiking – or walking – would be the way to get more active again, and it’s worked for me.  I now walk as many as 12 miles a week, and typically at a pace right around 4 mph (which is pretty damn fast for walking).  I also mix in a solid amount of jogging and flat-out running.  Here are some notes on what I learned. As usual this is as much for myself and as notes for my fam/friends as it is for stopper-by’s.  It’s not an article.  Sorry, i like to share but don’t have time to write nice articles, so forgive me if it’s not well written.

1. Start slow.  Enjoy your initial walks, just go around a few blocks or through the neighborhood for a while and get used to using your body again.  Let your legs and back limber up and relax for a few weeks.

2. Gradually build up, and start scoping out nice courses.  I live between two lakes, so it was very easy for me to figure out where I wanted to walk. You will probably exercise longer and more frequently if you can find a nice course with interesting or pleasant views that’s a decent distance.  I like the lakes because once I’m around it I really have no choice but to continue.

3. Track your time and progress.  You can’t improve what you can’t measure.  I use Cardio Trainer on my Android phone.  It tracks your progress with the built in acceleromator like a pedometer would, as well as using GPS, so it’s quite accurate.  It can also play music for you, and interrupt the music at an interval you choose to announce the distance, time, pace etc. to you.  It also builds a map of your route, and saves your workout history; very, very handy piece of software, and it’s free.  I know endurance runners who have spend hundreds of dollars on GPS watches that don’t do a fraction of what Cardio Trainer does.

4. Shoes, shoes, shoes.  It makes a difference.  I spent my 20’s and early 30’s without actually knowing what size shoe I wear.  It turned out that one foot is a half size longer than the other, and both are wide.  I spent years with painful feet, until I figured this out and was able to buy properly fitting shoes.  Even knowing your size isn’t enough though – manufacturers all shape their lasts slightly differently, so you need to experiment at the shoe store and find a proper fit.  Don’t worry about color, and don’t buy fashion sneakers – they hurt you more than they help.  The best fit is the absolutely most important factor, and as you get into longer, faster walks improperly fitting shoes will quickly reveal themselves in the form of pain and injuries. I personally wear New Balance, and have friends who swear by Saucony.  DON’T buy those rocking sneakers that say they exercise you by walking, standing, etc.  The odd shape will cause you injuries, and they’ve been largely disproven as snake oil.

5. Consider supports, especially if your feet hurt at the end of a normal day.  I went to Road Runner sports and purchased a pair of their custom molding inserts.  I had already bought some for my son who had been using prescription orthotics (which can cost hundreds of dollars) and while I was there I bought a VIP Membership.  Using this, and going back on VIP appreciation day, I was able to get my orthotics for 60 dollars.  The difference was immediate and obvious – I went in wearing flat fashion sneeks (Skechers) and my feet in extreme pain.  I walked out ready to jog.  I wear them in all my shoes now – simply pulling them out and placing them in my dress shoes, my street shoes, my running shoes, etc and they’ve made a huge difference.

6. I personally love to sweat, but hate the feeling of sweat on my clothing.  By spending a few bucks on wicking dry clothes, like the Champion stuff they sell at Target, I can enjoy an awesome workout without getting swamp ass.  Yes, there’s quick drying underwear – I wear these underneath my shorts, and it makes a huge difference in comfort and coolness.

7. Use a heart rate monitor.  Most folks don’t really know if they’re even in the fat burning zone much less cardio zone.  An HRM can tell you exactly what zone you’re in, let you bump into different zones (like a few minutes in an-aerobic) and help keep you at a steady pace.  I bought one that works via bluetooth to Cardio Trainer, and Cardio trainer will tell me to speed up or slow down to stay in the zone I specified.  HRM’s are pretty affordable, very comfortable and disappear under your shirt.

8. Which reminds me, unless you’re in your 20’s and have an admirable specimen of a human body, please wear a shirt.  Seriously, noone likes seeing the 50 year old guy running without a shirt, and there’s really no reason for it since the wicking shirts evaporate sweat more effectively than it pooling on your skin anyhow.

9. The Army used to use FITT as a mnenomic: Frequency, Intensity, Time, Training: walk frequently – I shoot for every other day, maintain proper intensity (hence the hear rate monitor and cardio Trainer), and stay at it for a while.  It’s better to walk for an hour at a slower pace than for 20 minutes at a slightly higher pace – another reason to use software and an HRM to track yourself.  And training – keep track of your results, work to improve on your existing time, and keep up the Googling to learn more.

10. Stretching – I don’t do it beforehand.  Recent research seems to indicate that it should only be done afterwords.   

11. Energy bars, energy drinks, recovery drinks, chocolate milk are all for endurance athletes.  If you’re a couch potation trying to get more active then trust me – your body does not need a powerbar to make it through a 3 mile walk any more than it needs recovery drink (or chocolate milk, the recovery drink of pros).  These are designed for people who’s body doesn’t have the stores necessary; by using them you’ll just be adding more calories to yourself.

12. Diet – it matters.  It matters hugely.  Eat better.  There’s tons of research and info on how to get a better diet.  Here’s my hint: you basically can’t eat healthy if you eat out.  Even restaurant salads can come loaded with badness.

13. Shin Splints.  Oy.  They hurt, and they can put you down.  Don’t ignore them, don’t grunt through the pain like I did.  Research them carefully.  They aren’t an impact injury like many think, and you can get them whether you’re going uphill, downhill, or on flats.  They are an overuse and mechanical injury that can be the result of poor shoes, weakness of the muscles and tendons involved, or even – believe it or not – your foot technique.  Yes, there’s such as thing as technique in walking and running, and areas like your gait, how you land on your feet etc can have a big impact.  I was put down for 6 weeks by shin splints so bad that I would get them while just walking; here’s what I did:

      a) invested in new shoes for new padding.  This wasn’t the issue though.
    b) invested in custom orthotics.  This helped a bit (and helped greatly in other ways).
    c) took a LOT of time off.  More than I wanted too, but had to let them heal.
    d) tried a taping technique that helped a little bit.
    e) starting doing toe lifts and heel walking at home.
    f) returned slower, shorter, and just walking (without any jogging or running) and focused on my foot technique.  Less heel strike means I’m not lifting my toes as high.

a couple months later, and I’m completing 4 miles again without pain.

14. Mix it up to avoid boredeom and burnout.   This morning I’m going for a 4 mile hike instead of a fast walk.  It will be slow and I probably won’t get in the zones I’d like to, but it will limber me up, use muscles I don’t normaly use while walking/running (the lateral muscles) and will keep me active.
   

If you recently changed your Google password, good for you.  Now you’re most likely trying to figure out how to change the damn thing on your Android phone so it can synch again.  Sadly, this takes actual figuring out.  You would think that under “Accounts and Settings” there would be a simple ‘Change Password’ button for each connectors, since they bothered making central connection interfaces for the whole system, and since we really should be changing our passwords every month or so, right ?  Well, they didn’t, and there’s exactly one interface on the entire system for changing your password.  And it’s basically an Easter Egg.  

So here’s how I was finally able to do it.

1) from main screen, go into phone settings. PHONE settings, not mail settings.

2) Select Accounts and Sync.

3) Select your Google account.  Attempt to synch it until you get the failed synch notification at the top of the screen.  This is the triangle with the exclamation point.   Drag that guy down to receive the full notification that synch failed.

4) Now, and only now, will you find the only interface in the entire system that lets you change your Google account.  Change it.


It really shouldn’t be this hard, but it is.  Fortunately the solution googles relatively easily, but now it googles even easier.


And Google – seriously – please add an obvious enough option for each connector.  This is a ridiculously unintuitive process for what should be a quick easy task.  Also, while you’re at it, could you get on making a car Navi system ?  Cause I’m this far from ripping our crap out and duct-taping a Droid to the dashboard.


Time for me to finally get a rant off my chest, after having once again seen this appear …

Have you ever been concerned about the privacy or security of a website and read their policies only to find statements like these  “we use military grade encryption”  or “we use the same encryption banks do” ?   Despite the reassuring boldness of the statements, they mean next to nothing and amount to weasel words.

They’re simply talking about a technology called Secure Sockets Layer – or “SSL” for short.  SSL has been around a long time, and is the accepted standard for encrypting network communications.   It is, generally speaking, a solid technology that really does do quite a bit to protect your data while it’s travelling over the internet.  Do banks use it ?  Absolutely.  Do military organizations ? Absolutely.    Does it make a computer system secure ? Absolutely NOT !   

It’s important to understand what Secure Sockets Layer does and doesn’t do, and how this all relates to computer security as a whole. Secure Sockets Layer is an encryption technology that can be implemented in many ways.  The most common by far, however, is to encrypt web traffic so that it can’t be read by eavesdroppers.  In fact, anytime your browser is pointing at a web address that starts with httpS://  (emphasis on the S) then you’re actually using SSL with that website.

As an example, let’s say you’re on a shared network (like in a hotel or cafe) with strangers on the network.  Whether you realized it or not, they can likely see all the traffic going between your computer and other computers (this used to be trivial for anyone to do, with the maturity of technology these days it can take a little effort to do, but is still a huge security concern).   If you visit a website without the S – just the regular http:// then the browser is sending information to and from the website unencrypted; and anyone on that hotel network or in the cafe could potentially eavesdrop on it.  With SSL however, the traffic is encrypted and reasonably protected from eavesdropping.   In fact, when properly implemented, SSL can even help you be sure that the website you’re communicating with is the website you expected it to be (and not, say, an imposter website pretending to be your bank).
Now SSL is an encryption technology, but not all encryption is created equal.  There are different types of encryption schemes, and strengths as well.  These are constantly changing and maturity to reflect growing needs.  Also, the actually SSL itself has different versions; there’s SSL version 1, SSL version 2, and SSL Version 3.0 (which usually goes by a slightly different name, but that’s unimportant to this article).  When a marketing weasel say they use “military grade” or “bank grade” encryption, they’re saying that they use the highest level of SSL – version 3.0 and specific ciphers with large keys – just like the big boys do.  And that’s a 100% truthful statement.  

The reason they are weasel statements, however, is because I’ve only described everything SSL does.  Don’t get me wrong; it’s a fundamental security requirement but it’s NOT the ONLY fundamental security requirement – the fact that a website uses SSL means next to nothing by itself.  Let’s look at some things SSL doesn’t do:

a) it doesn’t protect your data sitting on their server.  it only protects it from eavesdropping while it’s beng sent to the server.

b) it doesn’t prevent your information from being displayer to other users due to a programming error.

c) it doesn’t protect your data from an outside attack against the web application or web server.

d) it doesn’t help if the company has a “bad egg” working inside it.

e) it doesn’t ensure the company routinely patches their systems, routinely tests their systems, etc.

f) it doesn’t ensure that the company follows best practices for disposing of hard drives.  all the SSL in the world doesn’t help if they dump their old hard drives – with your data on themm – in the trash.

g) it doesn’t ensure they have any access controls on their systems, that they have strong password policies, that they run antivirus (and that it’s updated !) , that they have solid backups in place to prevent data loss,

h) it doesn’t ensure that your data isn’t housed overseas

Are you starting to get the picture ?  Oh, and by the way, I have witnessed every one of the above scenarios result in a breach – these aren’t fictional.

Computer and network security is a vastly large, complex and difficult challenge as proven by the countless organizations – big and small – technologies and non-technology companies alike- that get breached. Banks and governmental organizations spend millions to billions of dollars a year on it; it’s regulatedy by reams and reams of formal policy, technical guidelines and heaping spoonfuls of technical expertise … the use of SSL is but just one small checkbox amongst many standards, practices and ongoing operations.   

For a company to state “we use military grade encryption” as their sole security assertion is not only laughable, but insulting to one’s intelligence.   And with that, my rant is done 🙂

Given the numerous amount of computing devices I’ve had pretty much all  of my adult life, I’ve finally decided once and for all to forgo backing up locally and purchasing a NAS appliance.  In the past I’ve assembled DIY NAS’s at home (FreeNas, for example, Windows servers, etc) and have gotten to the point where I want an easy, self-managing appliance.  Home NAS’s now are really quite advanced, and many have some very useful features beyond merely shared storage, such as the ability to act as a print server (plug a printer into a USB device), DLNA servers (stream media), etc.   After some research I decided I liked the ReadyNas line most, and started figuring out which ReadyNas was for me.


I quickly discovered that there are *many* ReadyNas products, and the differences between them can be subtle.  I really could have used an online “guide” or “wizard” to help me decided what I needed … after hours of research (including speaking to a VAR and Netgear pre-sales support) here’s what I’ve discovered.  These are just raw notes, and not meant to be an article or guide:

Comparison chart: http://www.readynas.com/wp-content/uploads/2009/03/ReadyNAS_Comparison_Home.pdf

Drive Compatability list: http://www.readynas.com/?page_id=82

The “Ultra” line uses intel atoms.  The NV+ and non-ultra line uses Sparcs, which their pre-sales say is slower, use intels for better throughput and definitely for any media streaming.

The Ultra lines have the “normal” (ie 2 Ultra) and “Plus” (ie 2 Ultra Plus), the Plus is a dual-core atom processor, everything else is the same.

Software features appear to be the same across the line.

The X-Raid gives it theDrobo-like functionality of mish-mashing drive sizes.

Ultra line does not do AD integration.

Only the ultra 2 offers a usb 3.0 port for higher speed peripherals in case you wanted to plug a usb drive and share it via your nas.  Not sure why one would do that, or perhaps for faster initial loading ?

Of the Ultra’s, only Ultra 4 and Ultra 6 offer Raid 5.

The “2”, “4” and “6” in Ultra refer to bays.

Ultra 6 (and apparently only the 6 ?  ) can have an drives in chassis spec’d as a hot spare.  <— This can buy some time in case a drive fails while away from the NAS.  This becomes important when you’re on a trip and if a drive fails and you aren’t there to see it your storage could spend days or weeks in a situation where it has no additional fault tolerance.

They all use consumer grade drives, not “enterprise” (according to a review, haven’t looked at actual supplied drives)

Can buy diskless chassis and populate drives myself; be sure to read compatability chart.

Big question: with an existing 2 tb or data, how much capacity doI need for right now, and for future growth ?

More notes to come as I research more … I’m leaning heavily towards the Ultra 6 at thispoint, but it is pretty darn expensive, over a grand with 6tb of disks, and that may just be as a non-redundant volume.

Quick BBQ FAQ

Enough people have asked me about smoking barbecue that I figured it’s about time I write this up as proactive FAQ of sorts.  This will NOT teach you how to smoke q; it’s just a rattling-off of things.  There’s plenty of great bbq sites and forums that will give you the particulars.

First of all,let me state one thing: I make phenomenal barbecue. Better than you’ll get in any restaurant around here.  Better than Red Hot and Blue, Better than Famous Daves, and a hell of a lot better than that place in the Crystal City Underground.  I make Q so good I’ve converted vegetarians ( Shouts to Marcus !), and my kids do  a happy dance everytime I make it.  Yeah, seriously, it’s that damn good.  I literally gave away my gas grill after my second batch of barbecue – it was clear that I had no need for it anymore.


The best news is, there’s nothing special about me; it’s just that easy to make great BBQ at home if you’re willing to put in the effort. It’s simple see – making Q is really just a matter of how much effort you’re willing to put into it.  I put in levels of effort that aren’t commercially feasible, and it shows.  My Rib rub uses 24 different seasonings.  My brisket rub uses fresh Hatch Chile pepper from New Mexico – pepper that is vastly superiour from anything you’ll get in a local grocery store.  The last brisket I made weighed somewhere between 22 and 24 pounds, was so large I had to carry it on my shoulder, and smoked for 48 hours.  I hand selected it from a specific butcher and it had been chewing grass 2 days before I got it.  I rubbed it in a handmade rub using fresh Hatch chile’s, and smoked it with coal and hickory for 48 hours.   That’s effort, although dirt simple.   The good news is, this was a *massive* brisket and the longest smoke I’ve ever done. Most briskets will take an overnight, but I’ve never heard of one taking thatlong before. When it came out, I let it rest for a bit, then sliced into it,and it was magical.  The kids happy danced for it.  If you’re willing to put that kind of effort into it, then you can easily make great Q at home.

So here’s a few thing about smoking:

1. Get a smoker.  Don’t try to smoke on your Weber, no matter how much the sticker on that accessory waterpan says “makes great bbq”.  It ain’t bbq.  It’s a little smokeflavouring added to your direct heat grilling.

2. Smoking is about low and slow. If you’re inpatient, don’t bother.

3. It doesn’t take anything fancy.  I use a Silver Smoker – the cheapo entry model. I’ve done a few slight tweaks to it; there are many mods listed all over the internet for it,but frankly I don’t think it really requires any.

4.  The most important aspect is learning how to smoke correctly.  Rubs, sauces, all that stuff is second place to smoking correctly.  Google, read, try, be patient.

5. Most important rule when smoking is to be patient with temperature changes. Add some wood, wait a half hour  before checking temp.  Change a baffle vent, wait a half hour.

6.  I like any temp between 220 and 250.   My smoker definitely has a hot and cold spot, so I rotate the meat.

7.  Small (Costco) briskets take 12 to 15 hours easily.  Ribs take 6-8.  Large briskets take eons, but read 8.

8. It’s done when it’s done.  You can get rouch guidelines of how long it takes.  Every smoker, every cut of meat is different.   It’s done when it’s done.

9.  Use a thermometer for the meat, but also use your head.  Just cause it hits the safezone doesn’t mean you have to pull it. In fact brisket, unlike most cuts of beef, gets more tender the longer you cook it.

10. When doing a very long smoke,it does help to wrap the meat in foil  at some point. Most of the smoke entry into the meat is during the first and last several hours – in between is just cooking time.  wrapping it can help reduce the “charring” of the outside.

11. Go for smoke flavouring – don’t use so much wood that you have plumes coming out of the chimney.  Shoot for a thin streak.

12. I like to rub a day or two ahead of time, although I’ve also rubbed on the spot right at the smoker.

13. I find spareribs to be meatier, tastier, and generally more satisfying than back ribs.

14. I’ll rub q, but I never sauce it.  I’ll serve sauce as a condiment.  If your brisket is right, adults will eat it straight on a bun with no extras needed, although kids love to dump sauce over everything.  I personally like it on a bun with some sliced onion, a little “texas” style sauce, and some extra Tabasco on top.

15. Tabasco makes everything taste better.

16. you do NOT use Kingsford coal in your smoker. You MUST use coals that are safe for smoking with. Again, google, find a forum, learn.

17.  Yes, cheap thermometers are often wrong. However, better a cheap uncalibrated thermometer than none.  You MUST monitorin the meatbox temp !

18.  start off slow – it’s a lot easier to stoke up a cold firebox than let a hot one die down.

19. Yes, I grill on my smoker too, but everytime I do that an angel loses a wing.

20.  There is a temperature plateu in every piece of meat, where it seems like it stays at that temperature forever, and you may start having doubts.  Stick to your temp, don’t mess with nothin’, it will break that plateu then shoot up.

21. BE PATIENT. It’s done when it’s done. Don’t try to rush it.  Don’t try to meet a deadline with it. If it ain’t ready yet, but y’all are ready for dinner, order pizza.   Don’t suddenly stoke up the heat and try to cook the meat faster; you’ll end up ruining it and wasting your investment.

22. I like to reheat leftovers in a steamer.

So this is all I can think of right now.  Over  the last couple years I know some friends have gotten smokers at home because of me and swear by them now. If you have any questions give me a shout.